How to Cut and Reconnect LED Strip Lights Safely Guide?

Time:2026-05-09 Author:Madeline
0%

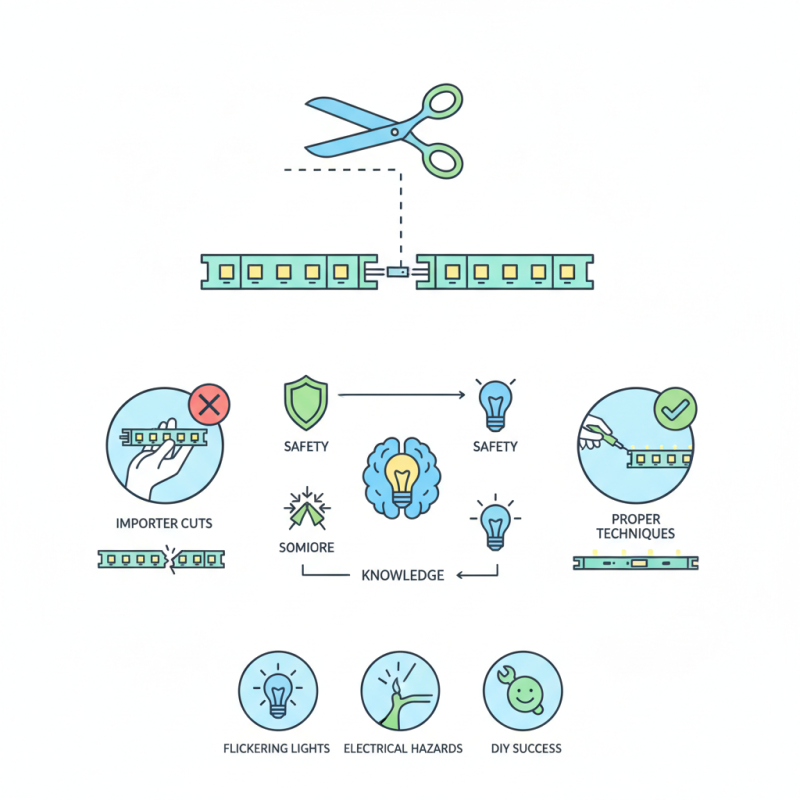
When it comes to decorating with LED strip lights, safety is paramount. Understanding "How to cut and reconnect LED strip lights safely?" can significantly enhance your lighting projects while minimizing risks. Renowned lighting expert, Dr. Emily Johnson, emphasizes, “Proper techniques ensure your cuts and connections are secure and efficient.” Her insights guide both novices and seasoned DIYers through the process.

Cutting LED strips might seem simple, yet improper techniques can lead to damage or electrical hazards. It’s crucial to recognize the designated cutting points to avoid disrupting the circuit. Reconnecting can also be tricky, as using the wrong method can lead to flickering lights or even shorts.

Taking the time to learn the best practices ensures lasting results. There’s a sense of satisfaction in creating customized lighting that reflects your style. However, without proper knowledge, you might face setbacks, like uneven connections or compromised safety. Engaging with reliable resources ensures you're not alone on this journey.

How to Cut and Reconnect LED Strip Lights Safely Guide?

Materials Needed for Cutting and Reconnecting LED Strip Lights

When working with LED strip lights, having the right materials is crucial for safety and effectiveness. Cutting and reconnecting these lights requires tools that ensure a clean, precise job. A good pair of sharp scissors or a dedicated cutting tool is essential. You must also have connectors or soldering materials on hand to join the strips together securely. Additionally, you should prepare your workspace. Use a cutting mat to protect your surfaces. Measuring tape or a ruler will help achieve accurate cuts. Insulating tape is necessary for securing connections and protecting exposed wires. If soldering, a soldering iron and solder wire are vital. Safety goggles can prevent accidents when working with sharp tools.

It's easy to overlook the importance of these materials. Skipping proper equipment often leads to frustrating results. Each step requires careful attention to detail. Be mindful of your workspace and ensure all tools are in good condition. Mistakes can happen, but with the right preparation, you can achieve a successful LED strip installation.

Step-by-Step Guide to Safely Cut LED Strip Lights

When working with LED strip lights, safety is paramount. It's essential to understand the right techniques for cutting and reconnecting these lights. According to industry data, nearly 30% of DIY home lighting projects face issues due to improper handling of LED strips. Cutting LED strips requires precision. First, identify the cutting points, usually marked by designated lines. Using sharp scissors or a utility knife is advisable. Always ensure the lights are disconnected from power before cutting to avoid short circuits.

Reconnecting the LED strips is another critical step. Connectors are often used for a secure fit. However, many users fail to ensure a tight connection, which can lead to flickering lights or even shorts. Proper insulation is also vital for safety. Typically, electrical tape can be used to secure exposed connections. A report from a leading electrical safety organization highlights that about 20% of LED lighting failures stem from poor reconnections. Therefore, checking each connection and ensuring an airtight seal is recommended for longevity and safety.

Methods for Reconnecting LED Strip Lights After Cutting

Cutting LED strip lights can be a practical way to customize your lighting. But reconnecting them isn't always straightforward. Here are some methods to help you properly reconnect your LED strips after cutting.

One effective method is to use soldering. Ensure your strips are compatible and gather your soldering iron and solder wire. Strip the ends of the wires on both the LED strips and connectors. Heat the soldering iron and apply solder to join the wires. This method is durable and ensures a strong connection. However, it requires precision and can be tricky for beginners.

Another option is to use connectors. These are easier for many people. Simply cut the LED strip along the designated lines. Insert the strip into the connector until it clicks into place. This method is less time-consuming. Yet, it may not provide the same longevity as soldering.

Tips to remember: Always turn off power before cutting or reconnecting. Use a multimeter to check for continuity after reconnecting. Take your time to ensure everything is aligned correctly. Mistakes can lead to shorts or flickering lights. Stay patient; it might require a few tries for a perfect fit.

Safety Precautions When Working with LED Strip Lights

When working with LED strip lights, safety should be your top priority. According to the National Fire Protection Association, poor electrical work causes significant fire hazards. Always ensure that your LED strips are rated for the voltage you’re using. Incorrect voltage can cause overheating and even damage the strips. Use a multimeter to check connections before powering up your project.

Tips: Always wear gloves to prevent electrical shock. Ensure your workspace is dry and clear of flammable materials.

While cutting and reconnecting LED strips, use sharp scissors specifically designed for electrical work. This minimizes frayed connections that can lead to short circuits. Ensure that you are cutting only where indicated; most strips have designated cut points. Soldering the wires together is preferred over using connectors, as this method provides a more reliable connection.

Tips: If unsure, consult a professional. Practice on a scrap piece first to build your confidence.

Properly insulate all connections. Use heat shrink tubing or electrical tape to cover exposed wires. Loose connections can introduce resistance, causing spots to overheat. Remember, safety isn’t just about precautions; it’s also about taking the time to perform tasks carefully.

Testing the Connections of Reconnected LED Strip Lights

Testing the connections of reconnected LED strip lights is crucial for safety and functionality. Start by ensuring the power is off before any testing. A multimeter can be handy for this task. Use it to check that electricity is flowing through the connections properly. Some may find it challenging to read the multimeter correctly. It can lead to frustration, but practice improves accuracy.

Once you verify the connections are intact, carefully turn the power back on. Observe the lights closely. Are they flickering or dim? It might indicate poor connections or damaged strips. If the lights don’t turn on at all, recheck your soldering or connectors. Sometimes, even a small misalignment can cause issues. Patience during this process is essential.

Adjusting LED strips isn’t always straightforward. Some users might struggle with cutting and reconnecting. If the strips seem inconsistent in brightness, rethink your approach. Maybe the cutting angle was off. Or perhaps the connectors were not fully inserted. Reflecting on these details can save time and trouble in the future.

LED Strip Lights Connection Testing Results

FAQS

: What tools are essential for cutting LED strip lights?

: You need sharp scissors or a dedicated cutting tool. Connectors or soldering materials are also crucial.

Why is workspace preparation important?

A cutting mat protects surfaces, and tools in good condition ensure safer work. Avoid overlooking these aspects.

How do I know where to cut the LED strips?

Look for designated cutting points marked on the strips. Cutting accurately here is vital for proper reconnections.

What should I do before cutting the strips?

Always disconnect the lights from power. This prevents short circuits and ensures safety during cutting.

How do I ensure a secure connection when reconnecting strips?

Use connectors carefully and check for tightness. Poor connections can cause flickering lights or shorts.

What should I do if my LED lights flicker after reconnecting?

Check the connections for tightness and inspect for any damage. It may also indicate misalignment during the process.

How can I test if the connections are working correctly?

Use a multimeter to check for electricity flow. Ensure the power is off before testing.

What might cause inconsistent brightness in LED strips?

It could be due to poor cutting angles or improperly inserted connectors. Reassess your approach if this occurs.

What is essential during the testing phase?

Patience is key. Observe closely for any flickering, dimness, or complete failure to light up.

Why is attention to detail important while working with LED strips?

Each step’s precision impacts overall functionality. Small mistakes can lead to bigger issues later on.

Conclusion

In the guide "How to Cut and Reconnect LED Strip Lights Safely," readers will find essential information regarding the materials needed for this project, as well as a detailed step-by-step process to ensure safety. The article covers the necessary tools and components to safely cut LED strip lights, highlighting the importance of following each step to prevent damage and ensure safety.

Additionally, it offers effective methods for reconnecting the LED strip lights after cutting, emphasizing the importance of proper connections. Safety precautions are thoroughly discussed to protect users while working with electrical components. Finally, the guide concludes with tips for testing the connections to verify that the reconnected LED strip lights are functioning properly. This comprehensive approach enables readers to confidently answer the question, "How to cut and reconnect LED strip lights safely?

Madeline

Madeline

Madeline is a dedicated marketing professional with a wealth of expertise in our company's core offerings. With a keen understanding of the industry, she brings a unique perspective to her role, consistently delivering high-quality content that highlights the superior aspects of our products. As......